 Recently, I was cleaning out one of the kitchen draws and came across a round Scottish wooden thistle shortbread mould.
On one of my mother's travels she went to Scotland and brought this piece of culinary art home. I inherited it and use it to make shortbread at Christmas. I love the thistle design on it.
Shortbread is a type of biscuit, or cookie, made from a simple recipe of flour, sugar and butter.
The history of shortbread goes back to the 12th century and originally started life as "biscuit bread". Biscuits made from left over bread dough that sometimes was sweetened and dried out in the oven to form a hard rusk. The practice took place over the British Isles, not just in Scotland
In the 16th century, Mary Queen of Scots had a circular shape made and cut into triangular wedges (known as petticoat tails) and often flavoured with caraway seeds.
Recently, I was cleaning out one of the kitchen draws and came across a round Scottish wooden thistle shortbread mould.
On one of my mother's travels she went to Scotland and brought this piece of culinary art home. I inherited it and use it to make shortbread at Christmas. I love the thistle design on it.
Shortbread is a type of biscuit, or cookie, made from a simple recipe of flour, sugar and butter.
The history of shortbread goes back to the 12th century and originally started life as "biscuit bread". Biscuits made from left over bread dough that sometimes was sweetened and dried out in the oven to form a hard rusk. The practice took place over the British Isles, not just in Scotland
In the 16th century, Mary Queen of Scots had a circular shape made and cut into triangular wedges (known as petticoat tails) and often flavoured with caraway seeds.
In early times, shortbread was very expensive and reserved as a luxury for special occasions such as Christmas, Hogmanay (Scottish New Year's Eve) and weddings. In Shetland and Orkney Isles they say it is a tradition to break a decorated shortbread cake over the head of a bride upon entering her new home.
The first known printed recipe is credited to a Scotswoman, Mrs McLintock, in 1736.
The thistle wooden mould I have is about the size of a bread and butter plate. The thistle is the Scottish flower emblem.
When I was researching shortbread. I came across a story about the thistle. It is said that
a troop of sleeping Scots were saved from ambush when a Norse army tried to sneak up on them. One of the attackers stepped on a thistle with his bare feet. He let out a "Yelp!" waking the Scottish soldiers who went on to defeat the invaders. What a great story, I had to mention it, whether true or not!
My mother's shortbread recipe.
Ingredients
250grams of butter
One third of a cup of castor sugar (or finely granulated sugar)
Two and a quarter cups of plain flour
A quarter of a cup of rice flour

Method
Cream together butter and sugar in a small bowl with an electric beater until light and fluffy.
Gradually sift in plain and rice flours.
Place onto a floured board and knead.
Dust mould with some extra plain flour and shake off any excess.
Press the dough firmly into the mould and trim away any excess dough with a sharp knife.
Turn moulds over and tap gently onto a lightly greased oven tray.
Bake in a slow oven for approximately 30 minutes until lightly golden.
Some people like to lightly dust icing sugar over the shortbread when cool.
Enjoy!
 Pizza, you normally smell the aroma in the air before you see it.
Recently I went out with friends to have pizza. When we were there you could see the man making and placing the pizza into his wood fired oven. It came up in discussion, where the first wood fired pizza ovens came from. It was unanimous, it must have been Italy!
Curiosity got the better of me and after reading many articles my findings are Italy was not the first!
They called the earliest ovens "Earth Ovens" A hole dug in the ground where people heated and cooked different foods. In Ukraine archaeologists found ovens in the ground dating back to 20,000 BC. They say there were mammoth bones in them!
Many different kinds and bizarre ancient ovens have been found by archaeologists, but the history of the wood burning oven as we know it today stems from Ancient Greece. The clay oven, or "Iponos" as it is called, is what Greeks used for cooking bread. Traditionally heated with brushwood, olive wood, oak or beech wood. When they finished using the oven for their main purpose, the remaining heat was not wasted: food baked consisted of rusks or drying fruit and nuts.
Rock ovens were used in Rome. A person called a "Law Giver" from Athens stated that bread should be consumed only during the Olympic Games as it was a very expensive product.
Pizza, you normally smell the aroma in the air before you see it.
Recently I went out with friends to have pizza. When we were there you could see the man making and placing the pizza into his wood fired oven. It came up in discussion, where the first wood fired pizza ovens came from. It was unanimous, it must have been Italy!
Curiosity got the better of me and after reading many articles my findings are Italy was not the first!
They called the earliest ovens "Earth Ovens" A hole dug in the ground where people heated and cooked different foods. In Ukraine archaeologists found ovens in the ground dating back to 20,000 BC. They say there were mammoth bones in them!
Many different kinds and bizarre ancient ovens have been found by archaeologists, but the history of the wood burning oven as we know it today stems from Ancient Greece. The clay oven, or "Iponos" as it is called, is what Greeks used for cooking bread. Traditionally heated with brushwood, olive wood, oak or beech wood. When they finished using the oven for their main purpose, the remaining heat was not wasted: food baked consisted of rusks or drying fruit and nuts.
Rock ovens were used in Rome. A person called a "Law Giver" from Athens stated that bread should be consumed only during the Olympic Games as it was a very expensive product.
The origin of the Italian pizza can be traced back to Ancient Greece about 7000 years ago where they made a flat bread called "Plakous" which was flavoured with toppings like herbs, onions and garlic. I wonder if the Italians will disagree with this finding?
I found an article where Archaeologists were surprised when 30 brick ovens were found in superb condition in the ruins of Pompeii. The Roman city was buried in moulton lava and ash in 79AD. The ovens had petrified bread in them. It is said these ovens were inspired by the Ancient Greeks. They consisted of bricks, ceramics and argyle.
I am glad the wood fired oven was invented to enjoy pizza. You can cook many things in them, but pizza is my favourite!
Since I have you in the mood, what about my homemade pizza?
Bernadette's Pizza
Ingredients
For the pizza dough
300ml of water, lukewarm
25 ml of olive oil
Half a tablespoon of sugar
450grams of plain flour
1 x 7 gram packet of yeast
Half a teaspoon of salt
One tablespoon of semolina
For the pizza topping
200mls creme fraiche
Quarter of a cup of cream
Quarter of a teaspoon of nutmeg
150grams of pancetta, thinly sliced
Half a red onion, thinly sliced
Quarter of a cup of rosemary, finely chopped
200 grams of thinly sliced peeled potatoes
A handful of rocket
Extra olive oil
Method
For the pizza dough.
Mix together in a bowl, water, olive oil, sugar and yeast and put to aside for 5 minutes.
Pour the flour into the yeast mixture and mix together. Put onto a lightly floured board and knead until light and elastic like. Roll into a ball and place back into bowl for 45 minutes or until it has doubled in size.
Topping
Mix together the creme fraiche, cream and nutmeg.
Pre heat oven to 250 degrees celsius.
Take dough and on a floured board knead it for about 10 minutes. Roll it out to approximately half a inch thick.
Sprinkle a little semolina evenly over the oven tray and place the dough onto it.
To assemble pizza, spread the creme fraiche mixture over dough base. Place the potato slices, red onion, pancetta and rosemary.
Place in the oven and cook for 10 minutes, or until the base is cooked through and crispy.
Remove from oven, place rocket on top and drizzle a little olive oil.
Cut into equal portions and place on table to enjoy!
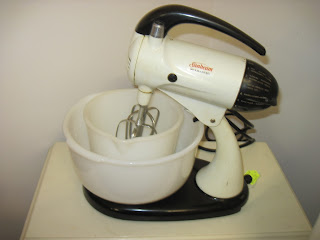 There is one kitchen appliance I would be lost without, my electric beater. In the past I used an electric hand held beater and later was given my mother's standing electric beater, when she passed. It is an old Sunbeam. Even though it is old, it works and still has all the attachments.
Today's electric beaters are equipped to take all types of attachments. Some people still like to use the hand held electric beaters but I prefer the stand type. There are so many colours it makes you wonder what is left to change on this this kitchen appliance!
Even commercially the standing electric beaters have changed making it easy for companies to mass produce their product.
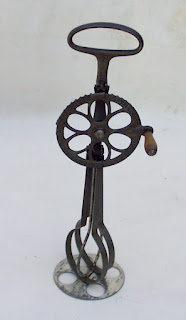
Have you ever wondered who invented this appliance? I read many articles and found in the middle of the 1800's a man named Ralph Collier from America patented a mixer with rotating parts. Then in England a couple of years later E.P. Griffiths patented one. It did not say, but these sound like the early hand-turned rotary beaters.
There is one kitchen appliance I would be lost without, my electric beater. In the past I used an electric hand held beater and later was given my mother's standing electric beater, when she passed. It is an old Sunbeam. Even though it is old, it works and still has all the attachments.
Today's electric beaters are equipped to take all types of attachments. Some people still like to use the hand held electric beaters but I prefer the stand type. There are so many colours it makes you wonder what is left to change on this this kitchen appliance!
Even commercially the standing electric beaters have changed making it easy for companies to mass produce their product.
Have you ever wondered who invented this appliance? I read many articles and found in the middle of the 1800's a man named Ralph Collier from America patented a mixer with rotating parts. Then in England a couple of years later E.P. Griffiths patented one. It did not say, but these sound like the early hand-turned rotary beaters.
 I read that the first mixer with an electric motor was invented by Rufus Eastman, an American, in 1885.
The Hobart Manufacturing Company from Ohio, America, in the early 1900's introduced a new model which played a large part in commercial cooking. Hobart first produced the Kitchen Aid and Sunbeam in 1910. It was Herbert Johnson, an engineer for Hobart Manufacturing Company, who invented an electric standing mixer. They say his inspiration came from observing a baker mixing bread dough with a metal spoon. In 1915 his large mixer was standard equipment for bakeries. In 1919, Hobart then introduced the Kitchen Aid Food Preparer - a stand mixer for the home.
Time will bring new inventions but one thing is guaranteed, I will still be using my mother's standing beater!
Whole Roasted Chicken With Lime
Ingredients
Half a cup of long grain rice
I read that the first mixer with an electric motor was invented by Rufus Eastman, an American, in 1885.
The Hobart Manufacturing Company from Ohio, America, in the early 1900's introduced a new model which played a large part in commercial cooking. Hobart first produced the Kitchen Aid and Sunbeam in 1910. It was Herbert Johnson, an engineer for Hobart Manufacturing Company, who invented an electric standing mixer. They say his inspiration came from observing a baker mixing bread dough with a metal spoon. In 1915 his large mixer was standard equipment for bakeries. In 1919, Hobart then introduced the Kitchen Aid Food Preparer - a stand mixer for the home.
Time will bring new inventions but one thing is guaranteed, I will still be using my mother's standing beater!
Whole Roasted Chicken With Lime
Ingredients
Half a cup of long grain rice
1 cup of water
1 stalk of lemongrass (white part only)
1 small piece of ginger
2 cloves of garlic
2 stems of coriander leaves
2 kaffir lime leaves (no stems)
Three quarters of a cup of shredded coconut (toasted)
1 large chicken approximately 1.5kilograms (free range if possible)
Ingredients for sauce to go in roasting pan
2 cups of water
Quarter of a cup of fish sauce
Quarter of a cup of brown sugar
Quarter of a cup of lime juice
 Method
Pre heat oven to 180 degrees celsius.
Place the rice and water in a small saucepan and cook for approximately 10 minutes on low heat until tender.
In a small food processor put in lemongrass, ginger, garlic, coriander and lime leaves. Blend until finely chopped.
In a bowl combine rice, lemongrass mixture and coconut. This mixture then goes into the chicken as a stuffing mix.
Tie the chicken legs together with string.
In the baking tray place sauce mix - water, fish sauce, brown sugar and lime juice stir until combined.
Place the chicken breast side down in the pan.
Cover with foil and bake for 40 minutes.
Take the chicken from the oven and remove foil. Turn chicken over and cover with foil and cook for a further 30 minutes. (If your sauce starts to evaporate, add a little more water).
Again, take chicken from the oven and remove foil. Baste with sauce and place back in oven without foil for 10 minutes.
I like to serve the chicken on a plate with a little rice stuffing, some steamed baby carrots and snow peas. Place the sauce from the chicken pan into a jug and let people pour over their chicken.
Enjoy!

 Recently, I was cleaning out one of the kitchen draws and came across a round Scottish wooden thistle shortbread mould.


