Christmas is not long over and a memory I would like to share came back to me.
Growing up Christmas was a special time, not only for the presents, food was special too. Traditionally my family enjoyed a leg of ham, thinly sliced and served on toast with mustard for breakfast.
My father and I especially enjoyed the mustard.
Later, in my twenties, I frequented a department store in the city. In the gourmet food section I discovered a wonderful looking jar. It was a creamy colour, either ceramic or pottery, with a red wax sealed lid. The seal was similar to the wax on letters or documents used in the old days.
I knew who would love this jar and its wonderful contents of wholegrain French mustard. I wrapped and gave it to my father.
You can still buy the mustard, it is called "Mustard Pommery - Moutarde de Meaux". The jar is about 250grams and comes from Meaux in France.
They say keep it cold and it will stay hot. I always keep mine in the fridge.
I read somewhere, not sure if it's true but makes for a great story, the recipe for the mustard originated with an ancient religious sect that lived in the town of Meaux, northeast of Paris. In the year 1760, the secret was revealed to the Pommery family and they have kept the secret recipe safe ever since.
Have you ever thought of making your own mustard? It's not hard. Here's one I have made a couple of times.
 Bernadette's Wholegrain Mustard
Ingredients
50 grams of yellow mustard seeds
50 grams of brown mustard seeds
120 millilitres of white wine vinegar
2 tablespoons of water
Juice of half a lemon
Half a teaspoon of salt
A pinch of pepper
Half a teaspoon of turmeric powder
6 tablespoons of sunflower oil
Method
In a bowl, place the yellow and brown mustard seeds, add 80 millilitres of white wine vinegar and let it stand for at least 1 hour.
The mixture will bubble and the seeds will soften slightly.
Next, pound the seeds and, if they have lost a bit of liquid, add about 1 to 2 tablespoons of water to the mixture.
Pound with the
pestle, adding small batches, grind and twist until most of the yellow seeds are slightly mashed. The brown seeds don't
crack easily but with pounding they will crack and emit
the flavours.
In a bowl with the mashed mustard seeds add the remaining 40 millilitres
vinegar, lemon juice, salt, pepper and turmeric powder. Mix ingredients well and place into a sterilized jar.
Add the oil on top and seal the lid tightly.
Let it stand for at least 4 weeks before use. The reason is because it ferments and forms the flavour.
Enjoy!
 Recently, I was cleaning out one of the kitchen draws and came across a round Scottish wooden thistle shortbread mould.
On one of my mother's travels she went to Scotland and brought this piece of culinary art home. I inherited it and use it to make shortbread at Christmas. I love the thistle design on it.
Shortbread is a type of biscuit, or cookie, made from a simple recipe of flour, sugar and butter.
The history of shortbread goes back to the 12th century and originally started life as "biscuit bread". Biscuits made from left over bread dough that sometimes was sweetened and dried out in the oven to form a hard rusk. The practice took place over the British Isles, not just in Scotland
In the 16th century, Mary Queen of Scots had a circular shape made and cut into triangular wedges (known as petticoat tails) and often flavoured with caraway seeds.
In early times, shortbread was very expensive and reserved as a luxury for special occasions such as Christmas, Hogmanay (Scottish New Year's Eve) and weddings. In Shetland and Orkney Isles they say it is a tradition to break a decorated shortbread cake over the head of a bride upon entering her new home.
The first known printed recipe is credited to a Scotswoman, Mrs McLintock, in 1736.
The thistle wooden mould I have is about the size of a bread and butter plate. The thistle is the Scottish flower emblem.
When I was researching shortbread. I came across a story about the thistle. It is said that
a troop of sleeping Scots were saved from ambush when a Norse army tried to sneak up on them. One of the attackers stepped on a thistle with his bare feet. He let out a "Yelp!" waking the Scottish soldiers who went on to defeat the invaders. What a great story, I had to mention it, whether true or not!
My mother's shortbread recipe.
Ingredients
250grams of butter
One third of a cup of castor sugar (or finely granulated sugar)
Two and a quarter cups of plain flour
A quarter of a cup of rice flour

Method
Cream together butter and sugar in a small bowl with an electric beater until light and fluffy.
Gradually sift in plain and rice flours.
Place onto a floured board and knead.
Dust mould with some extra plain flour and shake off any excess.
Press the dough firmly into the mould and trim away any excess dough with a sharp knife.
Turn moulds over and tap gently onto a lightly greased oven tray.
Bake in a slow oven for approximately 30 minutes until lightly golden.
Some people like to lightly dust icing sugar over the shortbread when cool.
Enjoy!
 Pizza, you normally smell the aroma in the air before you see it.
Recently I went out with friends to have pizza. When we were there you could see the man making and placing the pizza into his wood fired oven. It came up in discussion, where the first wood fired pizza ovens came from. It was unanimous, it must have been Italy!
Curiosity got the better of me and after reading many articles my findings are Italy was not the first!
They called the earliest ovens "Earth Ovens" A hole dug in the ground where people heated and cooked different foods. In Ukraine archaeologists found ovens in the ground dating back to 20,000 BC. They say there were mammoth bones in them!
Many different kinds and bizarre ancient ovens have been found by archaeologists, but the history of the wood burning oven as we know it today stems from Ancient Greece. The clay oven, or "Iponos" as it is called, is what Greeks used for cooking bread. Traditionally heated with brushwood, olive wood, oak or beech wood. When they finished using the oven for their main purpose, the remaining heat was not wasted: food baked consisted of rusks or drying fruit and nuts.
Rock ovens were used in Rome. A person called a "Law Giver" from Athens stated that bread should be consumed only during the Olympic Games as it was a very expensive product.
The origin of the Italian pizza can be traced back to Ancient Greece about 7000 years ago where they made a flat bread called "Plakous" which was flavoured with toppings like herbs, onions and garlic. I wonder if the Italians will disagree with this finding?
I found an article where Archaeologists were surprised when 30 brick ovens were found in superb condition in the ruins of Pompeii. The Roman city was buried in moulton lava and ash in 79AD. The ovens had petrified bread in them. It is said these ovens were inspired by the Ancient Greeks. They consisted of bricks, ceramics and argyle.
I am glad the wood fired oven was invented to enjoy pizza. You can cook many things in them, but pizza is my favourite!
Since I have you in the mood, what about my homemade pizza?
Bernadette's Pizza
Ingredients
For the pizza dough
300ml of water, lukewarm
25 ml of olive oil
Half a tablespoon of sugar
450grams of plain flour
1 x 7 gram packet of yeast
Half a teaspoon of salt
One tablespoon of semolina
For the pizza topping
200mls creme fraiche
Quarter of a cup of cream
Quarter of a teaspoon of nutmeg
150grams of pancetta, thinly sliced
Half a red onion, thinly sliced
Quarter of a cup of rosemary, finely chopped
200 grams of thinly sliced peeled potatoes
A handful of rocket
Extra olive oil
Method
For the pizza dough.
Mix together in a bowl, water, olive oil, sugar and yeast and put to aside for 5 minutes.
Pour the flour into the yeast mixture and mix together. Put onto a lightly floured board and knead until light and elastic like. Roll into a ball and place back into bowl for 45 minutes or until it has doubled in size.
Topping
Mix together the creme fraiche, cream and nutmeg.
Pre heat oven to 250 degrees celsius.
Take dough and on a floured board knead it for about 10 minutes. Roll it out to approximately half a inch thick.
Sprinkle a little semolina evenly over the oven tray and place the dough onto it.
To assemble pizza, spread the creme fraiche mixture over dough base. Place the potato slices, red onion, pancetta and rosemary.
Place in the oven and cook for 10 minutes, or until the base is cooked through and crispy.
Remove from oven, place rocket on top and drizzle a little olive oil.
Cut into equal portions and place on table to enjoy!
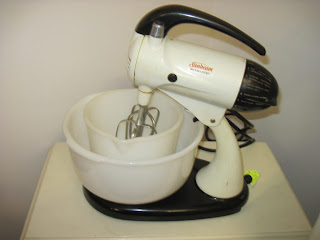 There is one kitchen appliance I would be lost without, my electric beater. In the past I used an electric hand held beater and later was given my mother's standing electric beater, when she passed. It is an old Sunbeam. Even though it is old, it works and still has all the attachments.
Today's electric beaters are equipped to take all types of attachments. Some people still like to use the hand held electric beaters but I prefer the stand type. There are so many colours it makes you wonder what is left to change on this this kitchen appliance!
Even commercially the standing electric beaters have changed making it easy for companies to mass produce their product.
Have you ever wondered who invented this appliance? I read many articles and found in the middle of the 1800's a man named Ralph Collier from America patented a mixer with rotating parts. Then in England a couple of years later E.P. Griffiths patented one. It did not say, but these sound like the early hand-turned rotary beaters.
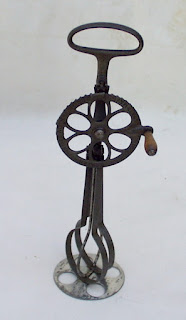 I read that the first mixer with an electric motor was invented by Rufus Eastman, an American, in 1885.
The Hobart Manufacturing Company from Ohio, America, in the early 1900's introduced a new model which played a large part in commercial cooking. Hobart first produced the Kitchen Aid and Sunbeam in 1910. It was Herbert Johnson, an engineer for Hobart Manufacturing Company, who invented an electric standing mixer. They say his inspiration came from observing a baker mixing bread dough with a metal spoon. In 1915 his large mixer was standard equipment for bakeries. In 1919, Hobart then introduced the Kitchen Aid Food Preparer - a stand mixer for the home.
Time will bring new inventions but one thing is guaranteed, I will still be using my mother's standing beater!
Whole Roasted Chicken With Lime
Ingredients
Half a cup of long grain rice
1 cup of water
1 stalk of lemongrass (white part only)
1 small piece of ginger
2 cloves of garlic
2 stems of coriander leaves
2 kaffir lime leaves (no stems)
Three quarters of a cup of shredded coconut (toasted)
1 large chicken approximately 1.5kilograms (free range if possible)
Ingredients for sauce to go in roasting pan
2 cups of water
Quarter of a cup of fish sauce
Quarter of a cup of brown sugar
Quarter of a cup of lime juice
 Method
Pre heat oven to 180 degrees celsius.
Place the rice and water in a small saucepan and cook for approximately 10 minutes on low heat until tender.
In a small food processor put in lemongrass, ginger, garlic, coriander and lime leaves. Blend until finely chopped.
In a bowl combine rice, lemongrass mixture and coconut. This mixture then goes into the chicken as a stuffing mix.
Tie the chicken legs together with string.
In the baking tray place sauce mix - water, fish sauce, brown sugar and lime juice stir until combined.
Place the chicken breast side down in the pan.
Cover with foil and bake for 40 minutes.
Take the chicken from the oven and remove foil. Turn chicken over and cover with foil and cook for a further 30 minutes. (If your sauce starts to evaporate, add a little more water).
Again, take chicken from the oven and remove foil. Baste with sauce and place back in oven without foil for 10 minutes.
I like to serve the chicken on a plate with a little rice stuffing, some steamed baby carrots and snow peas. Place the sauce from the chicken pan into a jug and let people pour over their chicken.
Enjoy!
Have you ever been to a restaurant and had so much that you couldn't finish your meal ?
Recently that happened to me, I asked to take the rest of the food home in a doggie bag. It was Chinese food and funny enough it wasn't a doggie bag but a plastic container that I took my food home in.
This made me think, how and where did this start?
Most people say the doggie bag started around World War II. People wanting to take home their steak bones for the dog. Restaurants in America started to accommodate the customer by doing so.
One story I read from 1949 was a restaurant named "Dan Stampler's Steak Joint" in Greenwich Ave, New York.
It is believed the restaurant always served large meals which customers often could not finish.
Mr Stampler knew most of his customers would be too embarrassed to ask for doggie bags, so he encouraged them to take the bone home for the dog.
 He was clever and had a doggie bag created for his restaurant. He designed a bag with an image of a Scottish terrier and called it a "Doggie Bag". A company in Chicago manufactured them for him. The bags were grease proof, so no other container was needed.
The company manufacturing the bags was the Bagcraft Corporation of Chicago. It is said Albert Meister and Norman Ressner company partners came up with the idea and put them into general distribution with restaurants. The co founders wife, Jane Meister wrote a poem for the doggie bag, which has been reprinted over 150 million times.
The poem:
Oh where, oh where have your leftovers gone?
Oh where, oh where can they be?
If you've had all you can possibly eat
Please bring home the rest to me!
So next time you are at a restaurant and take home a doggie bag, remember this story.
Something delicious you can have with your steak is my sauce recipe. I don't think you'll need a doggie bag for my food!
Shallot and Red Wine Gravy
Ingredients
250grams of shallots, sliced thinly
4 tablespoons of olive oil
1 garlic clove, peeled and finely chopped
A sprig of rosemary
5 tablespoons balsamic vinegar
400 mls of red wine
400 mls of beef stock
1 tablespoon of butter
Salt and ground black pepper to taste
 Method
In a medium saucepan on a low heat, place the shallots and oil, cook for about 3 minutes stirring until light brown. Season with a little salt and pepper, then add garlic and rosemary. Cook for a further couple of minutes always stirring to stop the shallots from burning.
Pour the vinegar in and cook until reduced to a syrup, then pour in the red wine and cook until reduced by two thirds.
Lastly, pour in the stock and bring to the boil. Simmer until reduced by two thirds. Remove the rosemary sprig. Then place in the butter and whisk.
This is a rich sauce and delicious with steak. I place it in a gravy jug so people can add how much they would like. Serve with steamed vegetables and Potato Noisettes.
Enjoy!!!
 Food is a journey and this is one I would love to share with you.
I heard this particular story a few times in my later life from a very special person, my father. Most of his stories were told at the kitchen table over a cup of tea.
My father was the backbone of my family. He supported us in every decision we made, whether it was right or wrong, he knew it would be a learning curve for us. If we fell, he was always there to help us back on our feet and move forward.
He has passed now and I feel it fitting to share one of his stories with you.
It was World War 2 and most men in Australia had joined the armed services to fight and protect our country.
My father was average height, with dark slightly curly hair and solid build. He joined the Australian Army and became a Signalman. His job as signalman was to lay the lines for communications.
The story began when he was in an Australian Army camp in Borneo. He did not tell me how long they had been there, my guess is it wasn't very long.
Borneo is a island to the north of Australia.
One morning, the Sargent in charge told him he would have to lay a cable to a camp not far away. I never asked how far it was because I never wanted to interrupt him. He did say he packed enough rations in his kit for a couple of days.
 He set out with his rifle, kit, the line to lay and map. The weather was hot and humid. As he made his way, he did not go through the jungle but followed the clearing along side it.
At times he heard noises and wondered if it was Japanese soldiers. He kept moving and made his way to the destination unscathed.
His destination was an American Camp. The officer in charge told him that they were grateful to have the communication line laid. My father intended to head back to his camp, but the American officer wouldn't have it. "You must be tired, sit down and I will have lunch brought to us."
The officer outranked my father, but he wanted to have lunch and this was overlooked.
Never one to turn down a meal, my father took him up on the offer and had lunch. It was turkey with trimmings. Not sure what the trimmings were!
While eating, my father commented how nice it was to have something other than bully beef. The officer could not believe what he was hearing, "Did you say beef?" The description of bully beef is it came in a can like spam, but they say it was like a salted- beef cured product more like corned beef.
I am not sure if it was the first trade negotiations my father made, but one was made!
The Americans were tired of turkey and the Australians tired of bully beef. An agreement was settled and somehow a couple of cartons of bully beef was swapped for a couple cartons of turkey.
On his return to the Australian camp he visited the the cooks tent and told them of his wonderful news. Yes, the cook was happy to swap.
They Australian's ate the turkey and loved it.......Never heard how the Americans liked the bully beef!
I always told him to write his stories for people to read. Sadly, my father never did. I wish he had, there were so many to tell.
I will share another with you soon.
This is not beef or turkey, but a delicious lamb dish.
Braised lamb with red wine and prunes
Ingredients
 1 Kilo or 2.2lbs of lamb shoulder
Half a cup of plain flour
1 cup of pitted prunes
1 tablespoon of minced garlic
1 chopped onion
A quarter of a teaspoon of ground cinnamon
Half a teaspoon of minced ginger
1 and half cups of red wine
Half a cup of beef stock
Salt and pepper to taste
2 tablespoons of olive oil
Method
Cut lamb into cubes and coat with flour. In a large fry pan on low heat put in half olive oil and cubed lamb. Sprinkle with salt and pepper, stirring until meat browns. Remove from stove, take out lamb and put to one side.
Return fry pan to stove and put in remaining olive oil, onions, garlic, prunes, ginger and cinnamon. Stir until well combined for a few minutes. Add wine, stock, lamb and simmer on a low heat for about 2 hours until tender. You can add water if the gravy starts to dry out.
I like to serve with mashed potato and steamed green beans.
Enjoy!
Paris is well known for being the city of romance. I would like to share a story with you that has a bit of history with a modern twist!
There is a pedestrian bridge called the Pont des Arts, or Passerelle des Arts, which crosses the River Seine.
It is said that in 1802 Napoleon had a nine-arch metallic bridge constructed for pedestrians. It is believed to be the first metal bridge in Paris. The engineers were Louis-Alexandre de Cessart and Jacques Dillon.
On 17th March 1975, the French Ministry of Culture listed the bridge as a national historic monument.
In 1976, the Inspector of Bridges and Causeways reported several deficiencies on the bridge. He noted damage caused by two aerial bombardments sustained in World War 1 and World War 2, as well as multiple boat collisions over the years. He closed the bridge in 1977 and in 1979, a barge rammed into it causing a 60 meter collapse.
The present bridge was completed in 1984 and was meant to be identical of Louis Arretche. The only difference was they reduced the number of arches from nine to seven.This would allow the look of the old bridge to be preserved while realigning the new structure with the Pont Neuf. On the 27th June 1984, the newly constructed bridge was inaugurated by Jacques Chirac, then Mayor of Paris.
The modern twist is something for the romantics. Since 2008 it is believed the romance between not only the people of Paris but the world and this bridge took a different turn.
 It started when a tourist with a padlock wrote the initials, or name, of their loved one on the lock and then placed it on the the side of the bridge, locked it and tossed the key into the Seine. It is meant to represent their love for each other.
Over the years people came from every part of the world to pledge a love lock. Unfortunately the locks grew and grew until the bridge could not stand the weight. Part of the grate came away with all the locks. On the 1st June 2015 the locks had to be removed as they thought it would be a danger. They say over a million locks were removed weighing 45 tons!
Caramelized Onion and Bacon Tart
Ingredients
Pastry
One and a third cups of plain flour
125grams of cold unsalted butter, cubed
1 egg yolk
1 tablespoon of iced water
pinch of salt
 Filling
4 slices of bacon cut into half inch pieces
4 small onions peeled and thickly sliced
One teaspoon of dried thyme
Salt & Pepper
1 cup of ricotta
1 egg yolk
Half a cup of freshly grated Parmigiano-Reggiano
Method
Pastry
Put the flour, butter and salt in a food processor and pulse until the mixture resembles breadcrumbs. Whisk egg and water in a bowl until combined. Slowly add the egg mixture to the flour in the food processor until the mixture forms a ball.
Turn pastry out on to a work surface and gently knead it. Form a disc shape for a round tart or log shape for a rectangular tart. Wrap in plastic and refrigerate for two hours.
After two hours take pastry out of fridge and roll out. Make sure your tart tin is greased and lightly floured.
Place the rolled pastry into the tin and gently press into shape, with a fork prick the pastry on the base. Place baking paper over the pastry and then top with dry beans. This stops the pastry from rising too high.
Place in a moderate oven and bake for about 20 minutes. Take out of oven and remove paper and beans. Return to the oven for about 10 minutes until lightly golden.
Take out of oven and put to one side to cool while you make filling.
Filling
Cook the bacon in a fry pan on a medium heat until the fat is rendered and the bacon is crisp around the edges. Don't over cook the bacon as it will need further cooking later. Drain on paper towels and set aside.
Place the onions to the pan and cook over medium heat until they start to golden brown, about 8 minutes. Turn the heat to low, add half the thyme and a pinch of salt. Cook until the onions are meltingly soft and deep golden brown, about 20 minutes.
In a bowl combine ricotta and egg yolk, a quarter of a teaspoon of salt, pepper to taste, the remaining thyme and a quarter of a cup of the Parmigiano. Make sure it is stirred well. Spread the ricotta mixture over the pastry evenly, then arrange the onion mixture over the top of that. Sprinkle the remaining quarter of cup of Parmigiano and the bacon over the top.
Place back in the oven and bake for a further 30 to 40 minutes, until the bacon is crispy and the ricotta filling is puffed and set.
Serve at room temperature with a fresh garden salad on the side
Enjoy!


 Bernadette's Wholegrain Mustard


